Interconnectivity Solutions
Harnessing a rich legacy of subsea expertise, our dedicated engineering team deliver pioneering subsea wet…

The digital images can be stored in a dedicated folder on the vessel server and therefore immediately available for the assessor to review them with special software, incorporating a range of drop-down tools such as wall-thickness and inclusion gauges. Image defects can be marked-up and stored together with comments. When all images have been assessed, a summary sheet is produced giving an overall result for the joint. The advanced software contains noise reduction features, brightness/contrast adjustment and identifies 16,000 levels of greyscale.


| Dimension/Mechanical | |
|---|---|
| Height | 127cm |
| Width | 90cm |
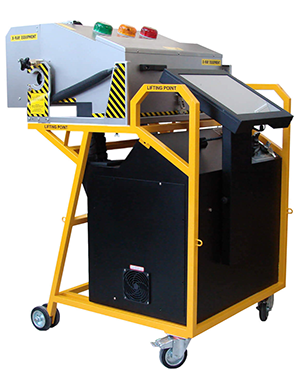
| Length | 110cm |
| Weight | 155kg |
| Manoeuvrability | 2 fixed castors, 2 free castors, Indicated lifting points, Lashing points provided |
| Power Requirements | |
|---|---|
| Voltage | 100-240V AC @ 50/60Hz |
| Power | 1. 2kW maximum |
| Supported Cable Sizes (using appropriate collets) | |
|---|---|
| Maximum | 90mm diameter |
| Supported Joint Sizes | |
|---|---|
| Maximum | 101mm diameter |
| Dimension/Mechanical | |
|---|---|
| Type | Bespoke mono-block x-ray tube |
| Max tube voltage | 50kV |
| Max tube current | 2mA |
| Calibration | kV and mA settings optimized for polyethylene inspection |
| Detector | |
|---|---|
| Technology | CMOS |
| Resolution | 3072 x 1944 |
| Bit depth | 14-bits per pixel (up to 16,383 grey scale levels) |
| Pixel Pinch | 75µm |
| Image area | 145mm x 230mm |
| Image quality | CMOS |
|---|---|
| Sensitivity | Better than 3% |
| Un-sharpness | 0.16 |
| Positioning | |
|---|---|
| X-Ray source | Fully adjustable across width of cabinet, computer-controlled, motorized, 0.1mm accuracy |
| Imaging panel | Fully adjustable across width of cabinet, computer-controlled, motorized, 0.1mm accuracy |
| Joint | Guide-plate ensures user loads joint in correct position |
| Cabinet rotation | Manual operation with rotation lock and angle indication, Computer interface indicates required position, 0 to 165 degrees range of movement, Additional locking fastener at 0 degree position for storage and transportation |
| Imaging | |
|---|---|
| Quality indication | Bespoke IQI’s installed in cabinet appear on each image |
| Image correction | Automatic dark, gain, and panel defect correction |
| Image enhancement | Multiple-exposure averaging gives highquality low-noise images |
| Image size | Approximately 13MB per image |
| Image data | Embedded tags store detector position, joint serial numbers, job details, etc. |
| Archiving | Images sorted into folders to enable easy retrieval |
| User Interface | |
|---|---|
| Type | Touch-screen, graphical user interface |
| User functions | Step-by-step step guidance through inspection process, on-screen review of previous images, Export image sets to USB drive |
| Supervisor functions | Review and edit joint and cable definitions, add new joint and cable definitions |
| Engineer functions | Perform full system set up and calibration |
| Security | PIN protection option to prevent unauthorized access to settings |
| Safety Features | |
|---|---|
| Visual warnings | 3-aspect coloured light signals (as per UK standards), high visibility markings highlight pinch-points around moving parts |
| Audible warnings | Integrated sounder, active during pre-inspection phase |
| Interlock sensors | Cable located, correct collets fitted, door closed, access panel secured, light signals operational |
| Emergency stop | ‘Mushroom’ button on control panel suspends all x-ray and motor operations |
| Access control | Key switch to enable x-ray operation, lockable power switch |
| Shielding | Radiation levels less than 2.5µSvh-1 at 50mm from all surfaces of x-ray cabinet |
| Image Inspection |
|---|
| Full image inspection software package available |
| Advanced image enhancements |
| Defect and wall-thickness measurement tools |
| Image annotation |
| Report generation |
| Inspection software to be located on a PC elsewhere |
SubConnect has built a strong foundation of expertise, skills, pioneering technology, equipment, and assets, establishing a reputation for quality, expertise, and reliability.